Read & Write Files
Read File
In automation, reading data from a text file is a very common scenario. Most programming languages have at least one way of reading text files, and PowerShell is not exception. Get-Content cmdlet reads a text file’s contents and imports the data into a PowerShell session.
The example shows how to read a list of names from a file.
$filu = Join-Path -Path $HOME -ChildPath "names.txt"
Get-Content $filu

The Get-Content cmdlet reads content from a file, and by default, returns each line of a text file as a string object. As a result, the collection of PowerShell objects becomes an array of string objects.
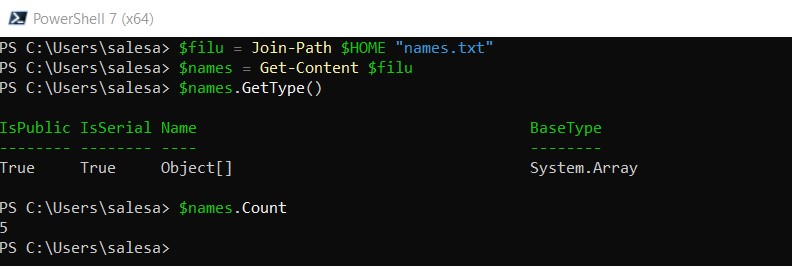
The following example shows how to set a list of names from a file to a variable, and show the type of the variable and how many elements are in the array.
$filu = Join-Path $HOME "names.txt"
$names = Get-Content $filu
$names.GetType()
$names.count

Get Specific Line
In the previous example, we saw that the default Get-Content result is an array or a collection of objects. Each item in a collection has an index number, and we can get a selected line with the index. Let's get the first name in the file. Please, note the parenthesis in the command.
(Get-Content .\names.txt)[0]

Get Specific Lines
You can use the TotalCount parameter in Get-Content to get a specified number of lines from a text file.
Get-Content .\names.txt -TotalCount 3

Write to File
We have couple different ways to add content to files.
Add-Content
The Add-Content cmdlet is an easy way to add content to a file. It uses PowerShell's formatting system to write to the file.
The following simple example shows how to add a variable of array type to a file. If the file does not exist, cmdlet will create the file in the specified path.
We will use parameters Path and Value of the cmdlet.
$friends = 'Arska', 'Bob', 'Calle', 'David', 'Erika'
Add-Content -Path .\names2.txt -Value $friends
notepad .\names2.txt

In the following example let's use Pipeline for an array
$names = 'Art', 'Bart', 'Calle', 'Diana'
$file = Join-Path $HOME 'names.csv'
$names | Add-Content $file
notepad $file

Out-File
The Out-File cmdlet sends output to a file. It uses PowerShell's formatting system to write to the file. The file receives the same display representation as the terminal.
The example shows how to send a list of the local computer's processes to a file. If the file does not exist, Out-File will create the file in the specified path.
$filu = Join-Path -Path $HOME -ChildPath "temp.txt"
Get-Process | Out-File -FilePath $filu
notepad $filu

Tee-Object
The cmdlet Tee-Object saves command output in a file or variable and also sends it down the pipeline.
The Tee-Object cmdlet redirects output, that is, it sends the output of a command in two directions just like the letter T. It stores the output in a file or variable and also sends it down the pipeline. If Tee-Object is the last command in the pipeline, the command output is displayed at the prompt.
The following example gets a list of the enabled local users on the computer and sends the result to a file. Because a second path is not specified, the local users are also displayed in the console.
Get-LocalUser | Where-Object Enabled -eq True | Tee-Object localusers.txt

CSV Files
CSV means comma separeted values. It is a plain text format with a series of values separated by commas. Earlier it was one of the most common file type for delivering data between different applications. And still nowadays it is widely used.
Read CSV
PowerShell has an Import-Csv cmdlet, it reads an existing CSV file.
In the following example we will use a csv file like in the picture. Please note that the first line is for headings. Data starts from the line two.

We can import it means read the csv file, and we can use the headings like properties of objects.
Import-Csv users.csv | ForEach-Object {Write-Host "Hello" $_.Firstname $_.Lastname}

Export CSV
We can create a CSV file using the Export-CSV cmdlet. The cmdlet converts objects into a series of comma-separated value (CSV) strings and saves the strings to a file. The cmdlet creates a CSV file of the objects that you submit. Each object is a row that includes a comma-separated list of the object's property values. Export-CSV cmdlet is udes for eaxmpke to create spreadsheets and share data with programs that accept CSV files as input.
In this example we will create a csv file of local users. With parameter Delimiter we can change the dimiter from default comma , to semicolon ;
Get-LocalUser | Export-Csv -Path .\localusers.csv -Delimiter ';'

Json
Reading JSON in PowerShell is quite straightforward. You can use the ConvertFrom-Json cmdlet to parse JSON data into PowerShell objects.
Why Json
JSON (JavaScript Object Notation) is widely used because:
1. Lightweight: Easy to read and write.
2. Language-independent: Supported by most programming languages.
3. Structured: Uses key-value pairs, making data easy to organize and access.
4. Efficient: Ideal for data interchange between servers and web applications.
Reading JSON from a file
# Read JSON content from a file
$jsonContent = Get-Content -Path "\File.json" -Raw
# Convert JSON content to a PowerShell object
$jsonObject = $jsonContent | ConvertFrom-Json`
Accessing JSON properties
# Access properties in the JSON object
$name = $jsonObject.Name
$age = $jsonObject.Age
Write-Host "Name: $name, Age: $age"
Modifying JSON data
# Modify a property in the JSON object
$jsonObject.Age = 30
# Convert the PowerShell object back to JSON
$jsonContent = $jsonObject | ConvertTo-Json
# Save the modified JSON back to a file
$jsonContent | Set-Content -Path "\File.json"